Painting stripes on walls transforms any room into a stunning focal point. Wall designs with paint and tape create visual interest without expensive wallpaper or major renovations. Whether you want vertical stripes to make ceilings appear higher or horizontal patterns to widen narrow spaces, this guide covers everything.
Learning how to paint stripes on a wall requires proper planning and technique. The right tools and methods ensure crisp, clean lines that look professionally done. This step-by-step tutorial shows you exactly how do you paint stripes on a wall with perfect results every time.
Table of Contents
Tools and Materials Checklist
Having the right tools makes the difference between amateur and professional-looking results.
Essential Tools:
- Measuring tape
- Level or laser level
- Pencils for marking
- High-quality painter’s tape (Frog Tape recommended)
- Paint rollers (4-inch and 6-inch)
- Angled brushes for cutting in
- Drop cloths for floor protection
Paint and Materials:
- Base color paint
- Stripe color paint
- Semi-gloss or satin finish paints (easier to clean and more durable)
- Paint primer if working on bare walls
- Clear painter’s caulk
Cleanup Supplies:
- Damp cloth for immediate cleanup
- Touch-up paint for minor imperfections
- Plastic scraper for pressing tape edges
Don’t skimp on tape quality as it makes the biggest difference in final results. Investing in proper tools upfront saves time and frustration during the project. Quality materials ensure your striped wall will look professionally done and last for years to come.
How to Paint Perfectly Straight Stripes on Your Wall
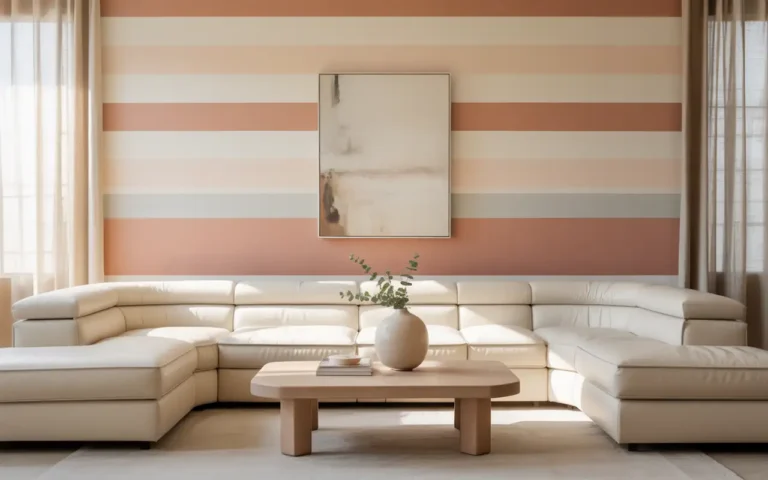
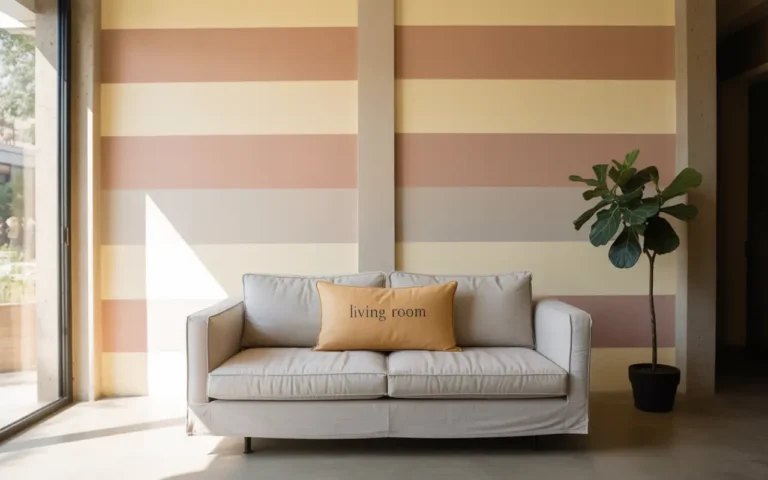
Creating walls with stripes designs starts with understanding the basics. Vertical stripes work well in bathrooms, hallways, and bedrooms. Horizontal stripes suit living rooms and dining areas. The key to success lies in careful preparation and using quality materials.
Professional painters know that straight paint lines depend on three factors: proper wall preparation, accurate measurements, and the right tape. Most DIY failures happen because people rush through these crucial steps.
Step 1: Plan Out the Stripes
Before you pick up a single paintbrush, you need a plan. Precision and attention to detail are key to this project. Consider what kind of look you want.
- Vertical stripes can make a low ceiling appear higher.
- Horizontal stripes can make a narrow room seem wider.
Once you decide on the direction, you need to measure. Use a measuring tape to find the full width of your wall. Divide this number by the number of stripes you want. For most rooms, a stripe width of 7 to 12 inches looks best. Aim for an even number of stripes to avoid having a narrow stripe in an awkward spot.
Step 2: Prep the Wall
A good paint job starts with a well-prepared wall. You can’t skip this step. First, remove everything from the wall, including furniture and wall hangings. Cover your floor with a drop cloth to protect it.
Next, inspect your wall for any damage. Fill small holes or cracks with spackle. Sand down any repaired areas until they are smooth and even with the rest of the wall. Use a damp cloth to wipe away any dust or dirt. Let the wall dry completely before you move on.
Step 3: Paint the Base Color
For most striped walls, you’ll paint the base color first. This is usually the lighter of the two colors you picked. This is important for a few reasons. It ensures you have a fresh, clean surface to work on. It also serves as the color for your “negative space” stripes.
Use a roller to apply the base color evenly across the whole wall. A small angled brush is great for cutting in along the ceiling and baseboards. Let this first coat dry completely. Apply a second coat if needed for full coverage. Let the base coat cure for at least 24 hours.
Step 4: Map Out Your Stripes
Now it’s time for measuring. This is the most critical step for getting straight paint lines. With your measuring tape, make a small pencil mark at the top of the wall for the edge of each stripe. Then, measure down the wall and make another mark.
Use a long ruler or a plumb level to connect the marks. A plumb level will ensure your lines are perfectly straight from top to bottom. You can also use a laser level for this. It projects a line onto the wall and makes this step much faster.
Step 5: Frog It Out
Using the right tape is a game-changer. Standard blue painter’s tape works, but for crisp, straight paint lines, many professionals prefer Frog Tape. Its special technology keeps paint from bleeding under the edges.
Carefully apply the tape along the outside of each pencil line. Press the tape down firmly with the back of your fingernail or a credit card. This creates a good seal. Make sure to tape the wall areas you do not want to paint. This is a common mistake. Double-check that your tape lines are straight and parallel.
Step 6: Apply One Layer of Base Color Over the Stripe Side of the Tape
This is the secret for painting stripes on a wall with no bleeding. It may seem odd, but it works every time. Once your tape is in place, take a small amount of your base color paint. Paint a thin layer directly over the edge of the tape you just laid down.
The base paint will bleed a tiny amount under the tape. It fills any small gaps or air pockets between the tape and the wall. Let this layer of base color dry completely. When you paint your stripe color, it will hit this sealed edge and not bleed through. This trick ensures you get perfectly straight lines.
Step 7: Paint Your Perfectly Straight Stripes
Now for the fun part. Using a roller, apply your chosen stripe color inside the taped-off sections. Use a 4-inch roller for clean application. You may need to use a small angled brush to cut in near the ceiling and baseboards.
Apply a smooth, even coat. Don’t press too hard on the roller. This can cause paint to seep under the tape. Apply a second coat if needed for a solid color.
Step 8: Remove the Tape
This is a key moment. You must remove the tape while the paint is still wet. If the paint dries, it can form a film over the tape. When you pull the tape off, the dried paint can peel away with it.
Carefully pull the tape off the wall at a 45-degree angle. Pull it slowly and steadily to reveal your perfect striped design. If you have a long piece of tape, you can score it with a utility knife first to prevent peeling.
How to Paint Horizontal Stripes on a Wall
Horizontal striped accent walls follow the same basic process with a few key differences. Measure your wall height and divide by the number of desired stripes. Mark stripe boundaries using a level to ensure they’re perfectly horizontal.
Start with your lightest color as the base coat. Horizontal stripes typically look best at 6 to 10 inches wide. Wider stripes work well in rooms with high ceilings, while narrower ones suit standard 8-foot walls.
Use the same taping and painting techniques described above. Pay extra attention to keeping horizontal lines level; uneven stripes are more noticeable than slightly off vertical ones.
Consider painting horizontal stripes in powder rooms, dining rooms, or as accent walls in bedrooms. They create the illusion of wider spaces and work especially well behind headboards or in alcoves.
You may also read: How to paint a ceiling?
Common Stripe Painting Mistakes to Avoid
Poor planning causes most stripe painting failures. Always measure twice and mark carefully before applying any tape. Rushing the preparation phase leads to uneven spacing and crooked lines.
Using cheap tape results in paint bleeding and ragged edges. Invest in quality painter’s tape designed for your specific paint type. Low-adhesion tape works best on recently painted surfaces.
Removing tape too late causes paint to peel off with the adhesive. Pull tape while paint is still tacky but not wet. The timing varies with temperature and humidity, so test a small area first.
Overloading brushes and rollers creates drips and uneven coverage. Use thin coats and maintain wet edges for smooth, professional-looking results.
You may also read: How to clean painted walls?
Choosing the Right Colors for Your Striped Wall
Color selection dramatically impacts the final appearance of your striped wall. Light colors make rooms feel larger while dark shades create cozy, intimate spaces. Consider your room’s natural light when choosing stripe colors.
Monochromatic schemes using different shades of the same color create subtle elegance. High-contrast combinations like navy and white make bold statements. Earth tones offer timeless appeal that works with various decorating styles.
Test your chosen colors on a small wall section before committing to the entire project. Colors can look different under various lighting conditions throughout the day.
Final Thoughts
Paint stripes on wall projects require patience and attention to detail, but the results are worth the effort. These techniques work for any room size or ceiling height. Practice on a closet wall or hidden area if you’re nervous about your first attempt.
For complex projects or if you prefer professional results without the DIY hassle, consider hiring house painters in San Diego. San Diego Home Remodeling specializes in decorative painting techniques and can help transform your space with expert craftsmanship.
Remember that even small imperfections add character to hand-painted stripes. The slight variations that come with DIY projects often look more interesting than machine-perfect patterns.
FAQs
How long does it take to paint stripes on a wall?
A typical accent wall takes 6-8 hours including prep time, base coat, and stripe application. Allow extra time for drying between coats.
What’s the best tape for painting stripes?
Frog Tape or other PaintBlock technology tapes provide the cleanest lines. Avoid masking tape, which allows more paint bleeding.
Can I paint stripes over existing paint?
Yes, as long as the existing paint is in good condition. Clean the surface thoroughly and allow proper drying time between the base coat and stripe application.
How do I fix paint bleeding under the tape?
Use a small artist brush to carefully paint over any bleeding with your base color. Work slowly and use minimal paint to avoid creating texture differences.
What stripe width looks best?
Most rooms look best with stripes between 4-12 inches wide. Narrow stripes (4-6 inches) create busy patterns, while wide stripes (8-12 inches) make bold statements.
Should I use vertical or horizontal stripes?
Vertical stripes make ceilings appear higher, while horizontal stripes make rooms seem wider. Choose based on your room’s proportions and desired effect.