A Tub to Shower Conversion is one of the most popular bathroom upgrades for modern homeowners. Many people no longer use their bathtub every day and prefer a shower that is easier to enter, clean, and maintain. Converting a tub into a shower can also make a bathroom feel larger and more functional.
Whether you want better accessibility, a modern design, or more usable space, a Tub to Shower Conversion can deliver long-term value. This guide covers costs, benefits, planning tips, materials, design choices, and common mistakes to help you make the right decision.
What Is a Tub to Shower Conversion?
A Tub to Shower Conversion involves removing an existing bathtub and replacing it with a shower system. The new shower can be a standard unit or a custom design based on your needs and available space.
Many homeowners choose a walk-in shower conversion because it creates a cleaner look and improves daily convenience. This type of project can range from a simple replacement to a complete bathroom redesign.
Why Homeowners Are Choosing Tub to Shower Conversions
Bathroom trends have changed over the years. More homeowners now prefer practical spaces that are easy to use.
Some common reasons include:
- Better accessibility for older adults
- Easier cleaning and maintenance
- Modern bathroom appearance
- Improved use of space
- Higher home appeal for future buyers
- Safer bathing experience
A well-planned tub to shower remodel can improve both comfort and functionality without requiring a full bathroom renovation.
Top Benefits of a Tub to Shower Conversion
More Accessible Bathroom Design
One of the biggest advantages is improved accessibility. A traditional tub often requires stepping over a high edge. A shower provides easier entry and exit.
Many homeowners choose a low-threshold shower to reduce the risk of slips and falls. This feature is especially helpful for seniors and people with mobility concerns.
A bathroom accessibility upgrade can help you stay comfortable in your home for years to come.
Creates More Visual Space
Bathtubs often make smaller bathrooms feel crowded. Replacing a tub with a shower opens up the room and improves movement.
Adding a sleek shower enclosure can make even a compact bathroom appear larger and brighter.
Easier Cleaning
Showers generally require less cleaning than tubs. Modern materials resist stains and mildew, helping reduce maintenance time.
Modern Appearance
Many homeowners choose a bathtub to shower remodel to update an outdated bathroom. A new shower can instantly transform the look of the room.
Features like tile walls, built-in shelves, and glass shower doors create a clean and modern style.
Is a Tub to Shower Conversion Right for Every Home?
Not always.
Before starting a tub shower conversion, consider how many bathrooms your home has.
If your home only contains one bathtub, removing it could affect future resale value. Families with young children often prefer having at least one tub available.
A conversion is usually a great choice when:
- The bathtub is rarely used
- Accessibility is a priority
- You want a modern bathroom
- You have another bathtub elsewhere in the home.
Types of Tub to Shower Conversion Options
Standard Shower Conversion
This option replaces the tub with a prefabricated shower system. It is often the most affordable choice.
Custom Shower Design
A custom shower offers greater flexibility with layout, tile, storage, and fixtures.
Many homeowners select a custom shower pan because it can be designed to fit the exact dimensions of the bathroom.
Walk-In Shower Conversion
A walk-in shower conversion removes barriers and creates easy access. These showers are highly popular in modern remodeling projects.
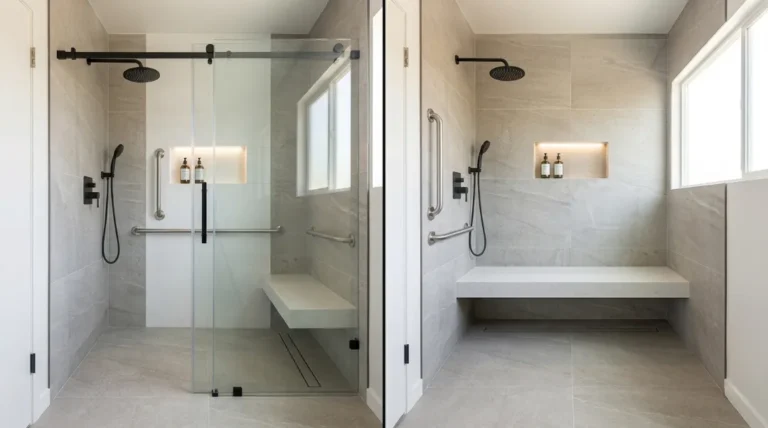
Luxury Shower Upgrade
Luxury conversions may include:
- Rainfall showerheads
- Body sprays
- Bench seating
- Heated flooring
- Frameless glass shower doors.
The Tub to Shower Conversion Process
Understanding the process helps you prepare for the project.
Step 1: Initial Assessment
A contractor evaluates:
- Plumbing layout
- Wall conditions
- Floor structure
- Drain location
Step 2: Tub Removal
The existing bathtub is removed carefully to avoid damage to surrounding surfaces.
Step 3: Plumbing Updates
Plumbing lines are adjusted to support the new shower configuration.
Step 4: Installation
The new shower system is installed. This stage may include:
- Waterproofing
- Tile work
- Fixture installation
- Drain adjustments
- Shower door installation
Step 5: Final Inspection
The contractor checks for leaks, proper drainage, and overall quality.
A professional tub to shower installation ensures the finished project meets safety and building standards.
Do You Need a Permit for This Project?
This is a question worth asking directly. Do You Need a Permit to Remodel a Bathroom? In San Diego, the answer depends on the scope of work. If the conversion involves moving drain lines or water supply connections, a plumbing permit is typically required. If structural changes are made to walls, a building permit may be needed as well.
Pulling permits is not just a legal formality. It protects you as a homeowner when it comes time to sell. Unpermitted work can complicate a real estate transaction significantly. A licensed contractor will handle the permit process for you and make sure every inspection is passed before closing out the job.
How Much Does a Tub to Shower Conversion Cost?
Costs vary based on materials, labor, and customization.
Typical price ranges include:
| Project Type | Estimated Cost |
|---|---|
| Basic Conversion | $3,000 – $6,000 |
| Mid-Range Conversion | $6,000 – $10,000 |
| Custom Shower Remodel | $10,000 – $20,000+ |
Several factors affect pricing:
- Tile selection
- Plumbing changes
- Shower size
- Glass door systems
- Accessibility features
- Waterproofing requirements
Every tub to shower renovation is unique, so obtaining multiple estimates is recommended.
The Bathroom Upgrades You Have Been Missing
A tub to shower conversion often opens the door to broader bathroom improvements. Once the old tub is out and the space is reworked, many homeowners take the opportunity to update their flooring, vanity lighting, or ventilation fan. These changes compound the value of the project and are much easier to do while the bathroom is already open.
If you are interested in broader improvements, our full San Diego Bathroom Remodeling service covers everything from layout changes and flooring updates to complete bathroom rebuilds. Bundling work together almost always saves time and money compared to scheduling separate projects.
Some homeowners also ask whether they can Fit a Freestanding Tub in Small Bathroom as part of a layout rethink. In cases where one bathroom gets a shower conversion, a second bathroom can sometimes accommodate a freestanding soaking tub for those who still want the option to bathe. A professional space assessment makes it easy to determine what is realistic for your home.
Conclusion
A Tub to Shower Conversion is a practical upgrade that improves accessibility, style, and daily convenience. Whether you want a modern walk-in shower or a complete bathroom refresh, the right design can transform your space for years to come. At San Diego Home Remodeling, we provide trusted San Diego Bathroom Remodeling Services tailored to your needs and budget.Contact us today to discuss your project and create a bathroom that works better for your lifestyle.
Frequently Asked Questions
How long does a tub to shower conversion take?
Most projects take between two and seven days depending on complexity and customization.
Can I convert a bathtub into a walk-in shower?
Yes. A walk-in shower conversion is one of the most requested bathroom upgrades today.
Is a tub to shower conversion expensive?
Costs vary widely. Basic projects may start around $3,000, while custom designs can exceed $15,000.
Will removing a bathtub hurt resale value?
It depends on your market and whether another bathtub remains in the home.
What is the best shower door option?
Many homeowners prefer frameless glass shower doors because they create an open and modern appearance.