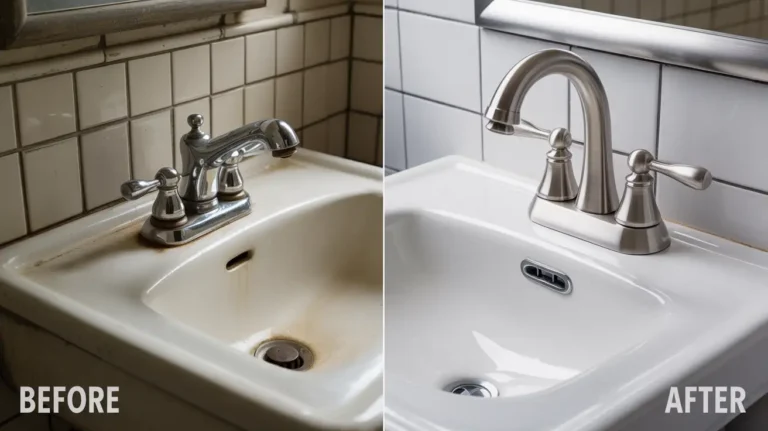
Replacing a bathroom faucet is easier than most homeowners think. With basic tools and about 1-2 hours, you can swap out that leaky, outdated faucet in the bathroom sink without calling a plumber. This guide shows you exactly how to replace a bathroom faucet, from turning off the water to testing your new fixture.
Whether you’re dealing with a dripping faucet, updating your bathroom’s look, or preparing for a larger renovation, this complete walkthrough covers everything you need. You’ll save $150-$300 in labor costs by doing it yourself, and the process works for most standard bathroom sink faucets.
Table of Contents
Before You Replace a Bathroom Faucet
Understanding Your Faucet Type
Not all bathroom faucets are the same. Before you shop for a replacement, check which type you have:
- Centerset Faucets use three holes spaced 4 inches apart. The handles and spout come as one unit. These are the most common in standard bathrooms and typically cost $50-$200.
- Widespread Faucets have separate handles and spouts with holes spaced 6-16 inches apart. They look more upscale and run $100-$500. You’ll see these in larger vanities.
- Single-Hole Faucets mount through one hole only. The single handle controls both temperature and flow. They’re perfect for small sinks and pedestal basins, priced around $40-$250.
- Wall-Mount Faucets attach to the wall instead of the sink deck. These need different installation steps than what we’ll cover here, so verify your mounts on the sink.
Measuring Your Sink
Grab a tape measure and check the distance between your faucet holes. This measurement is critical. A 4-inch centerset faucet won’t fit 8-inch widespread holes without extra work.
Count the total holes in your sink deck too. Most sinks have 1, 3, or 4 holes. If your new faucet has fewer connection points than available holes, you’ll need a deck plate to cover extras.
When to Call a Professional
DIY bathroom faucet replacement works great for standard sink-mounted faucets. But some situations need a licensed plumber:
- Your supply lines are corroded or leaking behind the wall
- You’re switching faucet types that don’t match your sink holes
- You notice water damage or mold under the sink
- The shut-off valves are broken or missing
- You want to add a vessel sink or wall-mount faucet
Professional installation in San Diego typically costs $200-$400 including the service call. Compare that to your faucet cost when deciding.
What You'll Need
Tools Required
- Basin wrench (essential for tight spaces)
- Adjustable wrench
- Channel-lock pliers
- Flathead and Phillips screwdrivers
- Flashlight
- Bucket or towels
- Putty knife
- Hacksaw (for stubborn supply lines)
A basin wrench is your best friend here. Its long handle and swivel jaw reach nuts in cramped spaces under the sink. You can pick one up at any hardware store for $15-$25.
Materials Checklist
- New bathroom faucet (with drain assembly if needed)
- Flexible supply lines (usually included, but verify)
- Plumber’s putty or silicone sealant
- Teflon tape
- Penetrating oil (WD-40 or similar)
- Paper towels or rags
Most quality faucets come with supply lines, mounting hardware, and installation instructions. Read the manual before starting. Some brands have specific steps.
How to Remove a Bathroom Faucet
Step 1: Turn Off the Water Supply
Look under your sink for two shut-off valves – one for hot water (usually on the left) and one for cold water (on the right). Turn both valves clockwise until they stop. These small oval handles control water flow to your faucet.
If you don’t have shut-off valves under the sink, you’ll need to turn off water at the main building shut-off valve. This is usually in your garage, basement, or outside near the water meter.
After closing the valves, turn on your faucet to release any water pressure left in the lines. Let it run until water stops flowing completely.
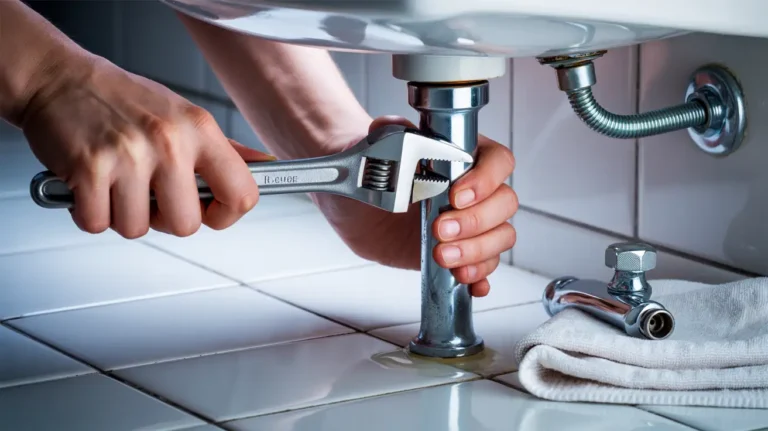
Step 2: Disconnect the Supply Lines
Put a bucket under the supply lines to catch leftover water. Use an adjustable wrench to loosen the nuts connecting supply lines to the shut-off valves. Turn counterclockwise.
Water will drip out, even though you shut off the valves. This is normal. Once the nuts are loose, unscrew them by hand and let the lines hang free.
If the nuts won’t budge, spray penetrating oil on the threads. Wait 10-15 minutes, then try again. Corroded connections are common in older homes, especially in areas with hard water like San Diego.
Step 3: Remove Mounting Nuts
Lie on your back under the sink with a flashlight. You’ll see mounting nuts holding the faucet to the sink. These can be plastic or metal.
Use your basin wrench to reach up and grab the nut. Turn counterclockwise to loosen. This takes patience. The space is tight and the nuts might be stuck.
For stubborn nuts, try these tricks:
- Spray with penetrating oil and wait
- Tap gently with a hammer to break mineral deposits
- Use a hacksaw to cut plastic nuts if they won’t turn
Remove all mounting nuts completely. Keep them if your new faucet doesn’t include replacements.
Step 4: Disconnect Supply Lines from Faucet
Once mounting nuts are off, go back under and disconnect the supply lines from the faucet itself. These connect at the base of the faucet stems.
Use an adjustable wrench or basin wrench to loosen these connections. Again, turn counterclockwise. Some faucets use quick-connect fittings that just pull apart.
Step 5: Lift Out the Old Faucet
From above the sink, grab the old faucet and lift straight up. It should come free now that all connections are removed.
You might need to wiggle it side to side if the old plumber’s putty is holding it in place. Don’t force it. Check underneath again to make sure you removed all mounting hardware.
Step 6: Clean the Sink Surface
Use a putty knife to scrape away old plumber’s putty, silicone, or mineral deposits from the sink surface. You want a clean, smooth area for your new faucet.
Wipe the surface with rubbing alcohol or a mild cleaner. This helps the new sealant bond properly and prevents leaks.
Step by Step Process: How to Replace a Bathroom Faucet
Step 1: Prepare the New Faucet
Unbox your new faucet and lay out all parts. Read the installation instructions completely before starting. Each manufacturer has slightly different assembly steps.
Some faucets need partial assembly before installation. You might need to attach the handles or connect supply lines to the base unit first. Do this above the sink where you can see clearly.
Step 2: Apply Sealant
Check your faucet instructions. Some require plumber’s putty around the base, others use a rubber gasket, and some need silicone sealant.
If using a plumber’s putty, roll it into a rope about 1/4 inch thick. Press it around the bottom edge of the faucet base. This creates a watertight seal and fills gaps between the faucet and sink.
Modern faucets often include a rubber gasket instead. Just place the gasket on the bottom of the faucet. No putty needed.
Step 3: Position the Faucet
Feed the supply line tubes and mounting hardware through the holes in your sink from above. Make sure the faucet sits flat and straight.
The spout should point directly into the sink bowl. Take your time here. Once you tighten everything underneath, repositioning is difficult.
Step 4: Secure Mounting Hardware
Get back under the sink. Thread the mounting nuts onto the faucet stems by hand first. This prevents cross-threading.
Once hand-tight, use your basin wrench to tighten the nuts firmly. Don’t overtighten. Plastic nuts can crack, and metal nuts can crush gaskets if you force them.
The faucet should feel solid with no wiggle. Test it by trying to rotate the faucet. It shouldn’t move.
Step 5: Connect New Supply Lines
Wrap Teflon tape around the threads of your shut-off valves. Wrap clockwise 3-4 times. This prevents leaks at the connection.
Attach the supply lines to the shut-off valves. Remember: hot water line goes to the hot valve (usually left), cold water line to the cold valve (right). Hand-tighten first, then use a wrench to snug them down.
Connect the other ends of supply lines to the faucet inlets underneath. These connections usually need a wrench too. Tighten until snug but don’t overdo it.
Step 6: Install the Drain Assembly (If Replacing)
If your new faucet came with a drain assembly and lift rod, now’s the time to install it. Remove the old drain by unscrewing the locknut under the sink.
Apply plumber’s putty around the new drain flange. Insert it into the sink drain hole from above. From underneath, thread on the rubber gasket, cardboard friction ring, and locknut.
Connect the lift rod to the drain stopper mechanism. Adjust the clevis strap so the stopper opens and closes smoothly when you pull the lift rod.
Step 7: Remove Excess Sealant
If you use a plumber’s putty, excess will squeeze out when you tighten the mounting nuts. Use your finger or a putty knife to remove this excess from around the faucet base.
Wipe the area clean with a damp cloth. Putty residue can attract dirt and look messy.
Step 8: Turn On Water and Test
Open both shut-off valves slowly by turning counterclockwise. Listen for any dripping sounds under the sink.
Turn on your new faucet. Water might sputter at first as air pushes out of the lines. Let it run for 30 seconds.
Check all connections under the sink while water is running. Look for leaks at:
- Supply line connections to shut-off valves
- Supply line connections to faucet
- Drain assembly connections
- Base of the faucet
If you see water, tighten the leaking connection slightly. Small drips usually stop with a quarter turn of the wrench.
Fill the sink and check the drain for leaks too. Watch the drain connections while the sink drains completely.
Troubleshooting Common Issues
Corroded Nuts Won’t Turn
This is the most common problem with bathroom faucet removal. Mineral deposits and corrosion lock nuts in place.
Spray penetrating oil on stuck nuts. Let it soak for 15-30 minutes. Try again with your basin wrench. Repeat if needed.
As a last resort, use a hacksaw to cut through plastic mounting nuts. For metal nuts, you might need a rotary tool with a cutting wheel. Be careful not to damage the sink or supply lines.
Supply Lines Too Short
New faucets sometimes have shorter supply lines than you need, especially on deep vanity cabinets.
Measure the distance from your shut-off valve to where the supply line connects on the faucet. Add 4-6 inches for bends and movement.
Pick up longer flexible supply lines at any hardware store. They come in standard lengths: 12″, 16″, 20″, 24″, and 30″. Braided stainless steel lines last longest and resist kinking.
Low Water Pressure After Installation
If your new faucet has weak water flow, check the aerator first. New faucets have screens in the aerator that sometimes have plastic debris or packing material.
Unscrew the aerator from the spout tip. Rinse it under water and look for blockages. Clean the screen with an old toothbrush if needed.
Also verify both shut-off valves are fully open. Partially closed valves restrict water flow.
Faucet Leaks at the Base
Water pooling around the faucet base means the seal isn’t working. This happens if you didn’t use enough plumber’s putty or if the mounting nuts aren’t tight enough.
Tighten the mounting nuts another quarter turn. If that doesn’t stop the leak, you’ll need to remove the faucet and reapply sealant.
Different Hole Configuration
You bought a single-hole faucet but your sink has three holes? Or vice versa? You have options.
For extra holes, use a deck plate (also called escutcheon plate). This metal plate covers unused holes and mounts under the faucet. Many widespread faucets include one.
Going from one hole to three holes requires drilling additional holes in the sink. This needs special tools and risks cracking the sink. Consider a different faucet or hiring a professional for this modification.
Understanding Faucet Costs
Faucet Price Ranges
Budget faucets cost $30-$75
These work fine for basic needs but might use cheaper materials like plastic components. Expect 2-3 years before issues develop.
Mid-range faucets run $75-$250
You get better finishes, brass or stainless steel construction, and longer warranties. These are the sweet spots for most homeowners.
Premium faucets cost $250-$600 or More
High-end brands offer superior finishes, ceramic disc cartridges that last 10+ years, and designer looks. Worth it if you’re doing a complete bathroom remodeling project.
DIY vs Professional Installation
DIY bathroom faucet replacement costs only the price of your new faucet plus any tools you need to buy. If you already have a basin wrench and basic hand tools, you’re looking at $30-$300 for just the faucet.
Professional installation in San Diego adds $150-$300 in labor. Plumbers charge $80-$150 per hour, and a standard faucet replacement takes 1-2 hours.
You’ll save money doing it yourself, but factor in your time and comfort level. If you run into corroded pipes or other issues, you might need professional help anyway.
Final Thoughts
Replacing a bathroom faucet is a manageable DIY project that updates your bathroom’s look and fixes common problems like leaks and low water pressure. You’ll need 1-2 hours, basic tools, and patience for working in tight spaces under the sink.
The key steps are turning off water, removing old mounting hardware, cleaning the sink surface, and properly sealing and securing your new faucet. Test all connections thoroughly before calling the job complete.
For homeowners in San Diego dealing with hard water issues, consider upgrading to faucets with ceramic disc cartridges. These resist mineral buildup better than traditional compression faucets. If your bathroom needs more extensive updates beyond changing bathroom sink faucet, San Diego Home Remodeling offers professional bathroom remodeling services in San Diego to transform your entire space.
Ready to upgrade your bathroom but not sure where to start? Contact us today for a free consultation and see how we can bring your vision to life.
FAQs About Replacing a Bathroom Faucet
How long does it take to replace a bathroom sink faucet?
Most people finish replacing the bathroom faucet in 1-2 hours. Your first time might take longer if you encounter corroded nuts or need to make extra trips to the hardware store. Experienced DIYers can complete the job in 30-45 minutes.
Do I need to replace supply lines when installing a new faucet?
Not always, but it’s smart. Supply lines cost $10-$20 and prevent potential leaks. If your existing lines are more than 5 years old, show any corrosion, or aren’t flexible braided stainless steel, replace them with your new faucet.
Can I replace a bathtub faucet the same way as a bathroom sink faucet?
No. A bathtub faucet installation is completely different. Bathtub faucets connect to pipes inside the wall, not under a vanity. The process involves removing wall tiles, accessing valve stems, and potentially soldering copper pipes. Bathroom sink faucets are much simpler.
What’s the difference between a centerset and widespread faucet?
Centerset faucets have handles and spouts connected as one unit, fitting sinks with holes 4 inches apart. Widespread faucets have separate handles and spout pieces, fitting holes 6-16 inches apart. Check your sink’s hole spacing before buying.
Why is my new faucet leaking at the base?
Leaks at the base usually mean insufficient sealant or loose mounting nuts. Tighten the mounting nuts under the sink with a basin wrench. If leaking continues, remove the faucet, apply fresh plumber’s putty or replace the gasket, and reinstall.
How do I know if my faucet is centerset or widespread?
Measure the distance between the outer holes in your sink. If they’re 4 inches apart (center to center), you have a centerset setup. If they’re 6-16 inches apart, you need a widespread faucet. Single-hole sinks have just one mounting hole.
Can I install a single-hole faucet in a three-hole sink?
Yes, with a deck plate. Most single-hole faucets designed for three-hole sinks include an escutcheon plate that covers the extra holes. The faucet mounts through the center hole while the plate covers the outer holes.
What tools are essential for bathroom faucet replacement?
A basin wrench is the most important tool. Its long handle and swivel head reach tight spaces under the sink. You’ll also need adjustable wrenches, channel-lock pliers, screwdrivers, and Teflon tape. A flashlight helps you see in dark cabinet spaces.
Should I use plumber’s putty or silicone sealant?
Check your faucet instructions first. Many modern faucets include rubber gaskets and don’t need putty or silicone. If sealant is required, plumber’s putty works best for most applications. Use silicone only if specified by the manufacturer, as it’s permanent and harder to remove later.
How tight should I tighten the mounting nuts?
Tighten until the faucet feels solid with no movement when you try to rotate it. Don’t overtighten. Excessive force can crack plastic nuts, strip threads, or crush rubber gaskets. Hand-tight plus a quarter turn with your basin wrench is usually sufficient.