Ever look at an old, dated oak cabinet or a sturdy thrift store dresser and wish it was a different color? If it has that signature plastic-like shine, you’re likely looking at a polyurethane finish. The big question is: can you paint over polyurethane without the mess of stripping it down to bare wood?
The answer is a resounding yes. While polyurethane is designed to be a permanent, repellent shield for wood, you can definitely change its look with the right preparation. In this guide, we’ll walk through the expert secrets to getting a professional-grade finish that won’t peel, skip, or bubble.
Table of Contents
What Is Polyurethane and Why Is It Challenging to Paint Over?
Polyurethane is a protective clear coat that creates a hard, durable shield over wood surfaces. Think of it as an invisible armor that keeps your furniture safe from scratches, moisture, and everyday wear. It’s incredibly popular for kitchen cabinets, dining tables, and hardwood floors because of its tough finish.
Here’s the challenge: polyurethane creates an ultra-smooth, glossy surface that paint simply can’t grip onto. It’s like trying to stick a Post-it note on a greased pan. Nothing wants to stay put. The finish is designed to repel liquids and resist damage, which means it also repels the paint you’re trying to apply. This slick surface causes paint to bead up, peel, or chip off within days if you don’t prepare it properly. Understanding this fundamental property is the first step toward a successful paint job.
Can You Paint Over Polyurethane? (Short Answer)

Yes, you can definitely paint over polyurethane, but there’s a catch you need to prepare the surface correctly first. Simply slapping paint directly onto a glossy polyurethane finish will lead to peeling and frustration. The key is creating a surface that paint can actually bond to through proper cleaning, light sanding, and using the right primer. With the correct preparation and materials, your painted finish can last for years without chipping or peeling.
When Painting Over Polyurethane Makes Sense
Painting over polyurethane is your best option when you want to update furniture or cabinets without the messy, time-consuming process of complete stripping. It works beautifully for pieces in good structural condition where only the color or style feels outdated. If you’re working on a large project like kitchen cabinets or built-in bookcases, painting over the existing finish saves you dozens of hours compared to chemical stripping.
This approach also makes sense when the polyurethane surface is in decent shape with no major cracks, deep scratches, or bubbling. Minor imperfections can be addressed during prep work, but a fundamentally sound finish means your paint will have a stable foundation to adhere to.
When You Should Not Paint Over Polyurethane
Skip painting over polyurethane if the existing finish is severely damaged, cracking, or peeling badly. In these cases, the unstable base will cause your new paint to fail quickly, no matter how well you prepare it. You’re essentially building on a weak foundation that won’t hold.
Also reconsider if you’re working with antique or valuable furniture. Original finishes on quality pieces often contribute to their value, and painting over them even poorly can significantly decrease worth. For high-traffic surfaces like dining tables or outdoor furniture that face constant moisture and wear, stripping down to bare wood and starting fresh typically provides better long-term durability than painting over polyurethane.
Why Paint Over Polyurethane Instead of Stripping It?
Stripping wood is often a messy, smelly, and grueling process. Here is why most DIYers prefer to paint over it:
Saves Time and Effort
Stripping polyurethane is genuinely exhausting work. Chemical strippers require multiple applications, tons of scraping, and hours of elbow grease. Painting over urethane, when done correctly, cuts your project time by more than half. Instead of spending an entire weekend just removing the finish, you can move straight to the transformation part.
Reduces Mess and Chemical Exposure
Chemical strippers are harsh, smelly, and frankly dangerous. They contain strong solvents that require excellent ventilation, protective gear, and careful disposal. By choosing to paint wood polyurethane instead of striping it, you’re avoiding toxic fumes and the sticky, gooey mess that comes with chemical removers. It’s a cleaner, safer approach, especially for indoor projects.
Cost-Effective Solution
Stripping supplies add up quickly chemical removers, scrapers, disposal materials, and often more wood conditioner afterward. The prep work for painting over poly requires just sandpaper, cleaner, primer, and paint. You’re looking at significantly less money spent on materials, making this approach budget-friendly without sacrificing quality results.
Preserves the Underlying Wood
Aggressive stripping can sometimes damage the wood beneath, especially on softer woods or veneers. Sanding too aggressively while stripping can create gouges or uneven surfaces. When you paint over a polyurethane surface with proper prep, you’re working with the existing finish as your base, which protects the wood underneath from unnecessary wear and potential damage.
Types of Polyurethane Finishes You Might Encounter
Before you start, you need to know what you’re up against.
Oil-Based Polyurethane
Oil based polyurethane has that warm, amber-toned look that deepens over time. It’s incredibly durable and was the standard for decades. You’ll typically find it on older furniture and traditional wood finishes. It has a distinct odor and takes longer to dry between coats.
Water-Based Polyurethane
Water based finishes look clearer and don’t yellow like their oil-based cousins. They’ve become increasingly popular in recent years because they dry faster, have less odor, and clean up with soap and water. Modern formulas are nearly as durable as oil-based options, making them a favorite for contemporary projects.
How to Identify Which Type You Have
Not sure which you’re dealing with? Rub a small hidden area with denatured alcohol on a lint free cloth. If the finish softens or dissolves, it’s shellac or lacquer, not polyurethane. For true polyurethane, check the color: yellowish or amber tints suggest oil based, while crystal-clear finishes indicate water-based. When in doubt, treat it as oil-based during prep that approach works for both types.
What Paint Works Best Over Polyurethane?
The “best” paint depends on your patience and the item’s use.
Latex Paint
Latex paint over polyurethane is my go-to recommendation for most projects. It’s user-friendly, cleans up easily with water, and produces minimal odor. Modern latex formulas are incredibly durable, especially when you use a quality based primer underneath. The key is choosing a high-quality acrylic latex with good bonding properties.
Oil-Based Paint
Oil based paint creates an exceptionally hard, durable finish that can withstand serious wear. It’s excellent for high-traffic pieces like kitchen cabinets or dining tables. The downsides? Longer drying times, stronger odors, and cleanup requires mineral spirits. But if maximum durability matters most, oil-based is hard to beat.
Chalk Paint
Chalk paint has gained massive popularity because it supposedly requires minimal prep. While it does adhere better than standard paints to slick surfaces, I still recommend light sanding for the best results. Chalk paint creates a matte, velvety finish that’s perfect for shabby chic or farmhouse styles, though it typically needs a protective topcoat.
Specialty Bonding Paints
Some manufacturers make paints specifically designed to grip difficult surfaces without extensive prep. These bonding paints contain special adhesion promoters that help them stick to glossy finishes. They’re more expensive but can be worth it for quick projects where minimal sanding is preferred.
Essential Tools and Materials You'll Need
Gather these before you open a single can of paint:
- Grit Sandpaper: You’ll need 120-grit for the initial scuff and 220-grit for smoothing.
- Cleaning Supplies: TSP (Trisodium Phosphate) or a strong degreaser.
- Primer: A dedicated “bonding” or based primer (shellac-based is a pro favorite).
- Paint & Tools: High-quality brushes or a small foam roller.
- Safety Gear: Dust mask and gloves.
How to Paint Over Polyurethane: Step-by-Step Guide
Follow these steps to ensure your hard work lasts for years.
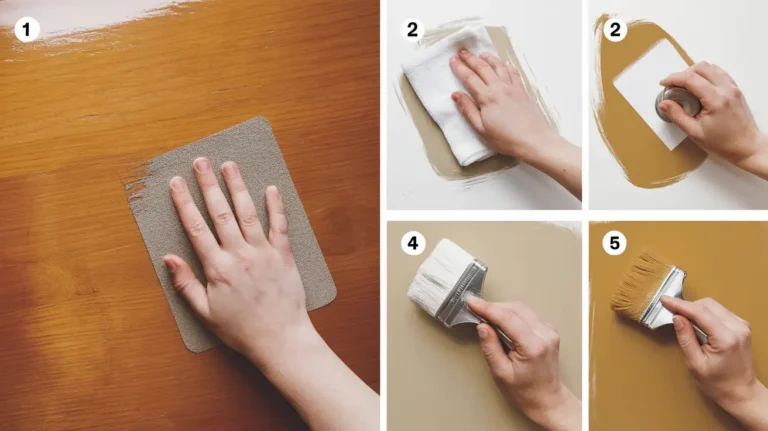
1. Clean the Surface Thoroughly
Start by removing every trace of dirt, grease, and grime. Use TSP (trisodium phosphate) cleaner mixed according to package directions, or a strong degreaser works too. Wipe down the entire surface with a damp cloth, paying extra attention to handles and areas people touch frequently. Kitchen cabinets especially accumulate cooking grease that’ll prevent paint adhesion. Rinse with clean water and let everything dry completely, usually a few hours or overnight. This unglamorous step makes or breaks your paint job.
2. Sand the Polyurethane Finish
Now comes the muscle work. Using 120 or 150 grit sandpaper, scuff sand the entire surface. You’re not trying to remove the polyurethane completely, just roughen it up enough for paint to grip. Think of it like scratching up glass so tape will stick. Sand in the direction of the wood grain using even pressure. You don’t need to sand down to bare wood; you just want to dull that glossy shine. An orbital sander speeds up large projects, but hand sanding works fine for smaller pieces and gives you more control.
3. Wipe Down and Remove Dust
Sanding dust is sneaky; it hides in corners and crevices, then creates bumps in your paint. After sanding, vacuum the surface and surrounding area thoroughly. Then wipe everything down with a tack cloth or slightly damp lint free cloth. Check your work by running your hand over the surface; it should feel smooth with no grit. Let any moisture evaporate completely before moving to the primer.
4. Apply a Bonding Primer
This step is absolutely non-negotiable. A quality based primer creates the bridge between slick polyurethane and your topcoat. I recommend oil-based or shellac-based primers like Zinsser BIN or KILZ Original. They grip polyurethane better than latex primers. Apply a thin, even coat using a quality brush or foam roller. Don’t overload your brush; multiple thin coats beat one thick, drippy coat every time. Let the primer dry according to manufacturer directions, usually 2-4 hours.
5. Apply the First Coat of Paint
Finally, the fun part! Stir your paint thoroughly, don’t shake it, as that creates bubbles. Apply your first coat in thin, even strokes, working in the same direction. For furniture, I usually paint in the direction of the wood grain for the most natural look. Don’t worry if the primer shows through a bit; that’s normal on the first coat. Focus on even coverage without drips or thick spots.
6. Sand Between Coats (If Needed)
Once your first coat is fully dry to the touch, lightly sand with fine 220-grit sandpaper. This isn’t heavy sanding, just a quick scuff to knock down any brush marks or small imperfections. It helps the next coat adhere better and creates a smoother final finish. Wipe away sanding dust with your tack cloth before applying the next coat.
7. Apply Additional Coats
Most projects need 2-3 coats of paint for full, even coverage and optimal durability. Wait for each coat to dry completely before adding the next rush. this step causes drag marks and uneven texture. Thin coats dry faster and look better than thick ones. By the final coat, you should have rich, even color with no primer showing through.
8. Let It Cure Properly
Here’s where patience pays off. Your paint might feel dry to the touch within hours, but full curing takes much longer typically 2-3 weeks for latex paint and even longer for oil based paint. During this curing period, treat your freshly painted piece gently. Avoid placing heavy objects on it or scrubbing it hard. The paint continues hardening during this time, becoming more durable and resistant to damage.
Can You Skip Sanding When Painting Over Polyurethane?
Many people ask, “Can I paint over polyurethane without sanding?” You can, but it’s a risk. If you absolutely hate sanding, you have two options:
Using Liquid Deglosser
Liquid deglosser (also called liquid sandpaper) chemically etches the polyurethane finish without physical sanding. You wipe it on, wait a few minutes, then wipe it off. It works reasonably well on flat surfaces but struggles in detailed areas or carvings. Honestly, I still recommend light sanding afterward for the best adhesion, making deglosser a supplement rather than a complete replacement.
Bonding Primers as an Alternative
Some specialty bonding primers claim to stick to glossy surfaces without any sanding. While they do adhere better than standard primers, you’re still taking a risk by skipping the scuff sand step entirely. For quick, low-stakes projects, you might get away with it. For furniture you care about or high-traffic pieces, invest the extra 20 minutes in light sanding.
When Sanding Is Absolutely Necessary
Never skip sanding on high-gloss finishes; they’re simply too slick for reliable adhesion. Pieces that get heavy use, like kitchen cabinets or dining tables, also demand proper sanding for long-lasting results. If you’re painting over poly that’s been waxed or oiled recently, sanding becomes even more critical to remove those layers. When durability matters, don’t gamble and sand it properly.
Common Mistakes to Avoid
Skipping Surface Preparation
I’ve seen too many projects fail because someone tried to rush past the cleaning and sanding. That glossy surface won’t hold paint, period. Taking shortcuts here guarantees peeling paint within weeks. The prep work isn’t glamorous, but it’s where successful projects are actually made.
Using the Wrong Type of Primer
Standard latex primers won’t cut it on polyurethane. You need a bonding primer specifically designed to grip slick surfaces. Shellac-based or oil-based primers are your friends here. Using the wrong primer is like trying to glue glass with Elmer’s technically adhesive, but not the right tool for the job.
Applying Paint Too Thickly
Thick paint looks tempting because it covers in fewer coats, but it dries slowly, traps moisture, drips easily, and remains softer long-term. Multiple thin coats create a harder, more durable finish than one thick coat. Think layers of protection, not one heavy blanket.
Not Allowing Proper Drying Time
Rushing between coats causes the underlying paint to stay soft, leading to drag marks when you apply the next layer. Even worse, insufficient curing time before using the piece can permanently damage your finish with marks and dings that won’t buff out. Read your paint can’s dry times and actually follow them.
Painting in Poor Conditions
Temperature and humidity dramatically affect how paint dries and adheres. Too cold, and paint won’t cure properly. Too humid, and it stays tacky forever. Aim for 50-85°F with moderate humidity. Also, painting in direct sunlight causes uneven drying and potential blistering. A climate-controlled garage or indoor workspace is ideal.
Tips for Getting a Professional-Looking Finish
Use Quality Brushes and Rollers
Cheap brushes shed bristles into your paint and leave brush marks. Quality synthetic brushes for latex or natural bristle for oil-based paint make a visible difference. For smooth surfaces, foam rollers create an almost sprayed-on look without the overspray mess.
Apply Thin, Even Coats
I can’t stress this enough: thin coats win every time. They dry faster, level better, and build up to a harder finish. Load your brush moderately, then spread the paint evenly rather than plopping on thick gobs.
Work in Good Lighting
Proper lighting helps you spot missed spots, drips, and uneven coverage while you can still fix them. Side lighting especially reveals brush marks and imperfections. A bright work light positioned at an angle shows everything.
Maintain Proper Temperature and Humidity
Keep your workspace between 60-80°F with moderate humidity for best results. Most paints won’t cure correctly outside this range. A small space heater in winter or a dehumidifier in summer can make the difference between success and frustration.
Consider a Topcoat for Extra Durability
For high-use pieces, a clear protective topcoat adds an extra layer of defense. Polyurethane topcoat (ironic, right?) or polycrylic in matte poly or satin finish protects your paint from scratches and moisture. Just make sure your paint has fully cured first.
Do You Need to Seal the Paint Afterward?
How you seal depends on the project and the paint. Low-traffic decoration items don’t need to be sealed very often; the paint itself protects them well. But furniture that is used frequently, like dining tables, kitchen cabinets, and bathroom vanities, should definitely have a protective topcoat. Water-based Polycrylic goes well over latex paint because it helps the paint last longer without turning yellow. Putting a screen cover on your phone is similar. You don’t have to do it every time, but it’s a great way to protect the screen from everyday wear and tear.
How Long Does Paint Last Over Polyurethane?
With the right prep work, paint and varnish can stick together for years, or even a decade or more, on pieces that don’t get much use. Things that get a lot of use, like kitchen doors, usually only need touch-ups every 5 to 7 years. This is about the same amount of time it takes for paint to last on any surface. Surface prep quality, base choice, and the number of coats you apply are the main things that affect how long the paint lasts. Pieces that have a clear finish usually last longer than those that don’t. Your paint job will last a lot longer if you clean it regularly with mild products.
When You Should Strip Polyurethane Instead of Painting Over It
If the current polyurethane is badly damaged, bubbling, or peeling off in large areas, you need to get rid of it all and start over. Antiques that are worth a lot should be stripped down and properly refinished to maintain their value. If you want to stain the wood instead of painting it, you’ll need to strip it, as the stain needs bare wood. Also, outdoor furniture that is exposed to harsh weather works better after being completely stripped and finished with the right outdoor products than after being painted over polyurethane, which can trap water and cause the furniture to break down early.
Conclusion
Painting polyurethane wood doesn’t have to be intimidating. With proper cleaning, light sanding, quality primer, and patience, you can transform outdated furniture into refreshed pieces you’ll love. The process takes more preparation than painting bare wood, but the results last for years when done correctly. Ready to tackle that project? If you need professional help with larger projects, San Diego Home Remodeling offers expert painting services in San Diego that deliver flawless, durable finishes every time.
Frequently Asked Questions
Can you paint over polyurethane without sanding?
Technically yes, using liquid deglosser and specialty bonding primers, but I don’t recommend skipping sanding entirely. Light scuff sanding takes only 15-20 minutes and dramatically improves paint adhesion. For best results and longest-lasting finish, always at least scuff the surface with fine-grit sandpaper.
What happens if you don’t prime polyurethane before painting?
Skipping primer is a recipe for disaster. Paint applied directly to polyurethane will peel, chip, and flake off within days or weeks. The primer creates the chemical bridge that allows paint to bond to that slick surface. Never skip this step, it’s your insurance policy.
Can you use chalk paint over polyurethane?
Yes, chalk paint adheres better to glossy surfaces than standard paint, but I still recommend light sanding for reliable long-term adhesion. Chalk paint also needs sealing with wax or polycrylic afterward since it’s naturally porous and stains easily without protection.
How long should you wait between coats when painting over polyurethane?
Follow your paint manufacturer’s recoat times, usually 2-4 hours for latex and 6-8 hours for oil-based. The surface should feel dry to the touch and not tacky. When in doubt, wait longer rather than rushing.
Will paint peel off polyurethane over time?
Only if you skip proper prep work. With thorough cleaning, sanding, and quality primer, paint bonds permanently to polyurethane. Projects I’ve completed using this method show zero peeling even years later with regular use.
Can you spray paint over polyurethane?
Absolutely. Spray painting follows the same prep requirements: clean, sand, prime, then spray. The advantage is smoother, more even coverage without brush marks. Just work in thin coats to avoid drips, and ensure excellent ventilation when using spray paint indoors.